
Configuring Default Options and Advanced Settings
MateMagz was developed and designed optimally so that users can use it easily. Installing and Customizing the MateMagz theme does not require any special knowledge of HTML, CSS or JavaScript.
Table of Contents
Forbidden Settings
Although you can customize the MateMagz theme flexibly. However, there are settings that are forbidden to change. The setting is Background image.
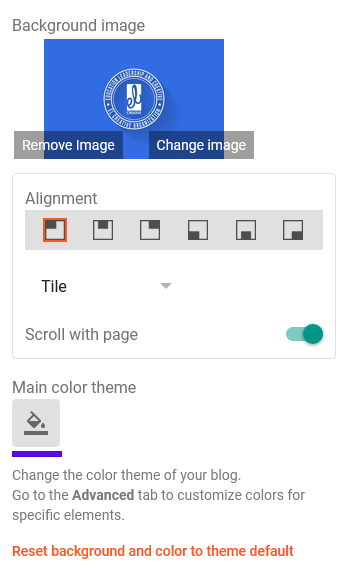
Initially, this setting is useful for changing Meta Image for Index page as well as for changing Key color (Browser Tab/Navbar Color). Since we still haven't figured out the best way to set it up, we hope you haven't changed anything in it.
Default Options
There's a Default setting that you don't really need to touch, but it's important and you can still customize it. Here are each one:
Viewport Pinch Zooming
This feature is useful for when the user wants to zoom in on a page on a mobile device or other touch screen device by pinch-zooming the screen, allowing you to zoom in and out. This functionality is mostly needed to provide an application experience on a web page.
By default, this feature is enabled. If it is disabled, it will cause problems for users with low vision who rely on screen magnification to properly see the contents of a web page.
But if you want to customize it, you can follow these steps:
- Go to Blogger Dashboard and select the Theme menu.
- Click the CUSTOMIZE button.
- Click Advanced Dropdown, click Default Options Dropdown.
- Look for the Slider setting named Viewport Pinch Zooming (Disable | Enable), drag the slider right or left. Here is the explanation:
- 1px: Disable - Pinch Zooming will be disabled.
- 2px: Enable - Pinch Zooming will be enabled.
- Click the Save button (diskette icon) in the lower right corner.
If you disable this feature, most Web Development Tools such as PageSpeed Insight and Web.dev will reduce the accessibility score.
Advanced Settings
All the documentation we created to customize the MateMagz Theme, about 98% you don't need to touch the code at all. But this time, you are required to touch the code via Edit HTML if you want to add a certain Meta Tag (Custom Meta Tag).
Custom Meta Tags
Here we will not explain more about Custom Meta Tags, because we are sure you already understand them.
If you want to add Custom Meta Tags, then we have provided a location to place them. Place your Custom Meta Tags just below the following code:
<b:comment>Put your Custom Meta Tag below</b:comment>Open Graph and image_src Image
You can change the image for the image_src Meta Tag as well as the image for the Open Graph by finding and changing the image URL below to the image URL you want:
https://blogger.googleusercontent.com/img/b/R29vZ2xl/AVvXsEipkx3EtPhNMvcN7sPqmw_obtZG3jcNFLAcbT4LzsGdZ0t4Q0ibVGjmiv-ejXFEx-t_1Z0dffVi8zHijKO1J69k5VkMuGlyFm0RkogRWOC9g9SWh7k9IMN2miKcCH5Y0YCo-NdF_KJXwWo/s720-rw/index.webpNote that this setting is only useful on the Index (Multiple Items) page.
Those are some steps to configure the Default Options in Materia X2 Theme. If you have any questions, please write them in the comments section.
If you want to report some bugs, you can write them in the comments section on the Bug Report page and if you want to request new features or want to provide feedback, please write them in the comments section on the Request and Feedback page.
[image] image_url [/image]
To add a code block:
[code] your_code [/code]
To add a quote:
[quote] your_quote [/quote]
To add a link:
[link] your_link_text | link_url [/link]